


The one with the... New Backyard Fence!
We were surprised to learn from our neighbors that the fence we had was pretty much the original fence from the 1970s! Back then, the wood wasn't pressure treated, and as a result, many of the posts, like the one on the left in ths picture below, rotted underground and they were hanging on by a thread:

The pieces of plywood that you see lining the bottom of the fence are to cover up holes in the chicken wire so the dog child can't escape. Also in the pictures below are more examples of rotted leaning posts.


Once we decided that we were going to tackle the fence replacement, Dave surveyed the existing fence to see how many posts and how many rails we needed. Some of the rails were newer and could be reused. The final count was 30 posts, 3 corner posts, and 60 rails! We also needed a gate for the fence that faces the front of the house on the other side. After calling around to get quotes on the wood and delivery charges, Dave figured out that once again, Fisher Lumber was our best bet! That's where we got our materials for the smaller fence replacement last year. Here's the wood, which the nice folks at Fisher delivered for free! (And a shot of the section of fence that we replaced last Fall)

The entire fence replacement took us 5 weeks, working both days on the weekend from sun up to sun down. I have to say that this was probably the hardest labor that I've ever done in my life! It was a lot of digging dirt, carrying heavy posts and rails, compacting dirt, leveling, clearing bushes, digging up tree stumps, moving rocks... we pretty much did every form of labor you could think of in a yard! Plus it was HOT and HUMID just about every weekend during those 5 weeks!
The project manager and supervisor for this project was Pluto. Although he would start off supervising us in the morning while it was still fairly cool, within a few hours, he'd go back inside in the nice air conditioning to nap or watch TV.

On the first day, we very quickly found out that the hardest part of the process was extracting the fence posts, especially if they were broken off. For fence posts that were actually still in tact, Dave started using a technique seen in the picture below, where he would wrap a chain around a piece of 2 by 4 wood and try to pull up the post using a cinder block.

On the first day, we extracted and reinstalled 6 posts! It doesn't sound like a lot, but it was a TON of work. For every post, we had to dig about 30 inches down underground in order to make sure the post was secure.
We borrowed tools from Dave's Dad and this solid steel pry bar (aka digging bar) was the most useful tool ever! It saved the day many times! We used it to loosen dirt:

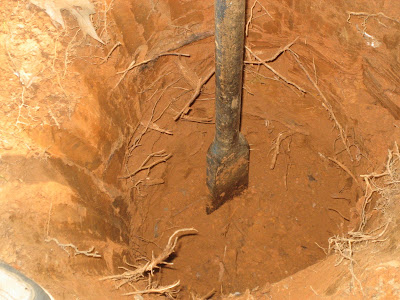
Dave also used the pry bar to extract stubborn posts like this one below...that was in the ground about 3 feet, surrounded by tough and compacted clay dirt and a tree trunk!

About half way through the fence project, Dave figured out that if he stuck the pry bar through one of the holes in the post, he could use a bunch of cinder blocks to pry the post up from the ground.

See how the post is coming up slowly but surely in the picture below? We got pretty good at using this method to extract posts. It consisted of team work: Dave would do the prying using his muscles, and I would restack and adjust the cinder blocks as the post got higher and higher up above the ground.


Finally on the 5th weekend, we got to the other side of the house! In the picture below, Dave is using the auger to dig into the ground for the very last post!

Compacting the last post with the handy dandy pry bar:

One of the last steps included cutting down the 10 ft rails so they would fit into the small sections. Because the ends need to be thinned so they can fit into the slots in the posts, Dave used a pencil and a chainsaw to get the rails exactly perfect!

The random cinder blocks we've found in the back yard has actually come in really handy during this whole project. In this picture below, the cinder blocks are holding the rail steady while Dave thins out the edges:

In the picture below, you can see the nicely cut and thinned rails that fit nicely into the slots, thanks to Dave's mad chainsaw skillz. After all the rails were in place, I stapled in the last section of chicken wire:

TADA!!!! ALL DONE!!!!!
Here's the finished project! One side of the yard:


Back side of the yard:


The other side (where we started):

And the view from the front of the house:

This was definitely the hardest project we've done so far-- not because of the difficulty level of the project itself. In fact, at one point, we had a good rhythm going because we had figured out the tricks and methods that work best for each task. This project was hard because of the patience, blood, sweat, tears, and muscle required.
Patience -- Thank goodness Dave is the most patient person I know because there were times when we were trying to dig out posts and I wanted to give up because I felt like I was digging to avail. Dave would say "why don't you go inside for a little while and I'll finish digging up this post?"
Blood -- Every weekend when we were out in the yard, there were the hundreds of mosquitos waiting to suck our blood. Bug spray didn't really help much, even the stuff that's 50% deet! I also lost blood while pulling out old chicken wire because the unpredictable and always flailing chicken wire would cut up my legs. So between the mosquito bites and the chicken wire wounds, my legs were not pretty during those 5 weeks. Tiger Balm and Neosporin were my two best friends.
Sweat -- Both of us lost water weight every weekend from the heat, humidity, and manual labor! Dave would weigh himself before he started in the morning and then again at the end fo the day just to see how much water weight he lost. I think his record was 3 lb weight loss in one day!
Tears -- No tears were shed in the making of this fence. :)
Muscle -- Obviously Dave is the more muscular of the two of us, so he did a lot of the tasks that required muscle and strength. To help him out, I did much of the prep work-- cutting out and removing old chicken wire (see "Blood" section above), trimming down trees/bushes and digging up roots that had grown into or through the old fence, clearing rocks, and carrying the posts and rails from the driveway to the work area.
PHEW! What a relief to be done!! We were SO glad to have our weekends back, but we were also very happy and proud of what we had accomplished in 5 weeks! Of course if we had hired professionals, it would have gotten done way faster, but it would have also cost us four times as much (especially when factoring in post hole extraction). All in all, we both agree that it was a DIY success!


wow, a very impressive project!!
-Helen