The One with the... Half Bathroom Makeover
>> Saturday, July 28, 2012 –
bathroom
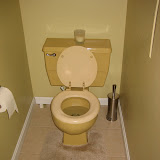
For the longest time I've wanted to redo the half bath on the main floor of the house. When we moved into the house over 2.5 years ago, we had an ugly salmon-colored toilet with a wooden seat. See exhibit A:

We immediately changed out the toilet for a new white toilet but didn't have the chance to do anything else. The walls in the half bath were painted a semi-gloss off white, just like the rest of the entire main floor of the house, and all the fixtures and hardware in the half bath were gold. See exhibits B, C, and D:

Gold mirror with a gold faucet and a light fixture from the 1970s!


Earlier this year we finally got around to tackling the half bath and give it the makeover that it desperately needed! The first thing that needed to go was the ugly light fixture. I had been eyeing pendant lights online and settled on this one from Home Depot. I liked the clean and modern look of the light fixture and the fact that it would accommodate up to 100 watts.
Typically, changing out a light fixture is a relatively easy job for Dave. Unfortunately, this switcharoo required a little more effort. As you can see in the picture of the original light fixture above, the pendant light isn't exactly centered above the sink and vanity. The previous owners had rigged the light so that it would appear centered by using a hook. We knew that we did not want the new pendant light to be off-centered because we knew that it would annoy us every time we saw it.
First, Dave cut a rectangle out in the ceiling and took out the junction box.

Then, he installed a new junction box in the new centered location. If you look closely, in this picture below, Dave is pointing at the outline of the old light. As you can see, it was only about a 6 inch move to the left.

Dave traced out and cut a piece of drywall to fit into the rectangular opening.

Dave had to screw in a piece of 2 by 4 across the floor joists so that he would have something to screw the new piece of dry wall into. Then he used fiber glass tape at the seams.

And then used joint compound to cover everything. After the joint compound dried came the the fun task of sanding the ceiling.

With the sanding done, we moved onto the next task. We decided to add some wainscoting to the bottom half and paint the bathroom blue! One of our friends recently installed wainscoting at her house and gave us some good advice. Following her advice, we ordered two of the same kits from Home Depot. Each kit comes with 8 ft of mdf wainscoting, 8 ft of baseboard, and 8 ft of chair railing, all of which are pre-primed and ready to paint.
First we took everything out of the bathroom so we could have a little more room, including the tank of the toilet and the baseboards.

In order to get the baseboards out with the pry bar without damaging the wall Dave used a scrap piece of plywood against the wall.

With the plumbing unhooked and the vanity out, there is actually enough room to move around in the half bath.

To take advantage of the vanity being out I decided to paint it so it wasn't the same exact oak color as the floor. We went with a dark blue/gray color called Anvil by Martha Stewart (color matched to Glidden brand paint)

And since I was painting already, the mirror would get a paint job too!

While I was painting, Dave started installing the wainscoting. We borrowed a nail gun from one of our favorite neighbors, which proved to be a HUGE help. First Dave cut the baseboards to size and fit them nicely in where the old baseboards sat. Next he installed each panel of wainscoting piece by piece and nailed each into place. We contemplated using glue in addition to the nails, but decided against it because with the nails and the overlapping panels, the wainscoting was pretty secure.

Dave was moving swimmingly around the room until he got to the window. We have large front windows on the first floor of the house, so this window is 56 inches tall. As with all of our previous projects, Dave needed a new power tool in order to complete this one. He had been itching to get a table saw for a while now and to be fair it probably would have made his life much easier if we had a table saw a long time ago. So, we finally splurged for a Dewalt table saw. (In case you didn't know, Dave is a snob when it comes with power tools... he only buys Dewalt brand, unless they don't make the power tool he wants).
To get the wainscoting to wrap around the window seamlessly, Dave taped a piece of butcher paper and drew out the shape that he would need to cut.

Then he cut the paper and traced it onto the wainscoting.


Then repeat the same thing on the other side of the window.

After Dave was done installing the wainscoting, but before he put on the chair railing, I painted the walls. Because the half bath is so small and we have so much leftover paint, I reused the same blue paint that we had from another project. The color is Misty Surf by Behr.

And in an effort to get rid of all the gold things in the house, we switched out the faucet to chrome.

Another thing that we're trying to do around the house is to switch out the outlets to GFI outlets wherever needed. This outlet is right by the sink and really needs a GFI outlet for safety. The good thing is that Dave has done this so many times around the house that he's now a pro!

Another thing that I've been eyeing is a towel ladder like these, which I've pinned on my Pinterest board.


Being the awesome husband he is, Dave built me my very own towel ladder! Compared to the other projects I've asked him to do, this was a cinch! Using two 2 x 3s and two long 1.25 inch dowels, he put this together in no time. We weren't worried about the sturdiness of the ladder because it's purely decorative and would only hold hand towels Dave just put a little of wood glue to secure the dowels.

With all the mini projects completed, here is the new half bathroom! The newly painted vanity and mirror, new faucet and vanity handles along with a new soap pump.

The towel ladder-- primed and painted.

The other side, with a new toilet paper holder.

The new pendant light fixture

And just this weekend, we completed the half bathroom makeover by framing and putting up the water color art that we picked up on our recent cruise on the Baltic Sea. We got three prints of Møllenstien, considered the most beautiful street in Aarhus, Denmark. These prints jumped out at us because we thought the colors would work nicely with the blue wall. Not only that, the artist himself was selling the prints by the cruise ship and we enjoyed talking to him!

As reference, here is a picture I took of Møllenstien. It really was a very pretty street!

With the wall art up, the half bathroom makeover is complete!
Read more...